

Technical Root Cause & Diagnostics
Windows 11 does not store all unnecessary data in one folder called “Other.” Storage usage can be spread across Temporary files, Windows Update cleanup files, Delivery Optimization files, Recycle Bin contents, application caches, crash dumps, old Windows installations, and large files hidden inside user or system folders.
I start by identifying which category is actually consuming the space instead of manually deleting random files from C:\Windows or C:\Program Files. Some files that look like junk are still required by Windows, installed applications, or pending updates.
Common signs include:
- C: drive suddenly loses several GB of free space.
- Settings → System → Storage shows a large “Other” or temporary-data category.
- Temporary files keep returning after cleanup.
- Windows Update downloads occupy substantial space.
- The
C:\Windowsfolder appears unusually large. - Storage becomes low again shortly after using Disk Cleanup.
Pre-Flight Sanity Checks (Rule Out the Basics)
1. Check what Windows actually reports
Open:
Settings → System → Storage
Allow Windows a moment to calculate the categories.
Check Temporary files, Installed apps, System & reserved, Other, Documents, Pictures, and Downloads.

Do not assume that “Other” means unnecessary files. It can contain legitimate application data and files Windows cannot classify into another category.
2. Check the Recycle Bin
Deleted files still consume disk space until the Recycle Bin is emptied.
Right-click Recycle Bin → Empty Recycle Bin.
Check the amount of space recovered afterward.
3. Find the actual free space
Open File Explorer → This PC and look at the C: drive.
You can also open:
Settings → System → Storage → Advanced storage settings → Storage used on other drives
This helps establish whether the problem is really the Windows system drive.
Method 1: Use Windows 11 Temporary Files Cleanup
This is the safest starting point because Windows identifies removable temporary-data categories for you.
Go to:
Settings → System → Storage → Temporary files
Windows will scan the drive and display categories such as:
- Temporary files
- Thumbnails
- Delivery Optimization Files
- DirectX Shader Cache
- Windows Update Cleanup
- Recycle Bin
- Previous Windows installation(s)
- Temporary Internet Files

Select the categories you understand and want to remove.
Be particularly careful with Downloads. Do not select it simply because Windows lists it as removable. Your Downloads folder may contain installers, documents, photos, and other files you still need.
If Previous Windows installation(s) appears, removing it can free significant space, but it also removes the ability to use the previous Windows installation for rollback.
Click Remove files.
Verification: Return to Settings → System → Storage and confirm that the selected category has decreased and that the C: drive shows additional free space.
Technical Note: Storage figures may take a short time to recalculate. A large reduction in temporary files does not necessarily produce the same reduction in the “Other” category.
Method 2: Run Disk Cleanup With System Files
Windows still includes the classic Disk Cleanup utility, which can identify additional system cleanup categories.
Press:
Win + R
Enter:
cleanmgrPress Enter.
Select the C: drive if prompted.
Click Clean up system files.
Select the C: drive again if Windows asks.
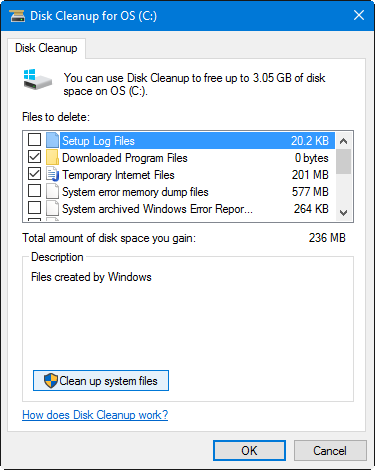
Review the list carefully.
Useful candidates can include:
- Windows Update Cleanup
- Temporary Windows installation files
- Delivery Optimization Files
- Device driver packages
- Previous Windows installation(s)
- Temporary files
- Thumbnails
Again, don’t blindly select every checkbox.
For example, deleting Downloads through a cleanup interface is only appropriate if you have confirmed that nothing important remains there.
Click OK → Delete Files.
On systems that have accumulated several Windows updates, Windows Update Cleanup can sometimes account for a meaningful amount of space.
Verification: Reopen cleanmgr, run the system-file scan again, and confirm that the previously large cleanup category is substantially smaller or no longer listed.
Warning: Do not manually delete files from
C:\Windows\WinSxS. The component store is managed by Windows, and manually removing files from it can damage servicing and update functionality.
Method 3: Clean Large System Caches and Component Data Safely
If “Other” remains large, investigate the locations responsible rather than deleting everything that looks unfamiliar.
Check the Windows component store
Open Terminal (Admin) or Command Prompt (Admin).
Run:
DISM /Online /Cleanup-Image /AnalyzeComponentStoreThis analyzes the Windows component store and reports whether cleanup is recommended.
If Windows reports that cleanup is appropriate, run:
DISM /Online /Cleanup-Image /StartComponentCleanupDo not interrupt the process simply because the percentage appears to pause.
The component store contains files Windows uses for servicing and updates, so the correct approach is to let DISM manage it.
You can also check Windows’ temporary directory:
Press Win + R and enter:
%temp%Select files that are clearly temporary and attempt to delete them.
Some files will refuse deletion because an application is currently using them. Skip those files rather than forcing deletion.
Verification: After restarting Windows, check Settings → System → Storage and confirm whether the System/Other usage has decreased and the C: drive has more free space.
Technical Note:
%temp%is a user temporary location, not a universal “safe to delete everything” folder. Files currently in use may remain, and that is normal.
Long-Term Prevention & Configuration Lock
1. Turn on Storage Sense
Go to:
Settings → System → Storage → Storage Sense
Enable it if you want Windows to periodically manage certain temporary files and Recycle Bin contents.
Open the Storage Sense settings and review the automatic cleanup options rather than enabling every option without checking what it affects.
2. Keep large personal files out of the system drive
If your C: drive is relatively small, large downloads, videos, game libraries, and application data can quickly consume available space.
Check:
Settings → System → Storage → Advanced storage settings → Where new content is saved
You can change where new documents, music, pictures, videos, and applications are stored when additional drives are available.
3. Investigate repeated growth instead of repeatedly deleting junk
If the C: drive loses several GB every few days after cleanup, the underlying cause may be something else:
- Windows Update activity
- A browser/application cache
- Cloud synchronization
- Crash dumps
- Game files
- Virtual machines
- Developer tools
- A malfunctioning application generating logs
Repeatedly deleting temporary files treats the symptom. Finding the directory that keeps growing is the better fix.
Advanced Edge-Case FAQ
1. Why does Windows 11 still show a large “Other” category after I clean Temporary Files?
“Other” is a classification rather than a dedicated junk folder. Windows may place application data, archives, miscellaneous files, and other content there.
If the category remains large, use Settings → System → Storage to identify related categories and then inspect your user folders, application data, and large files.
Do not interpret the entire “Other” figure as removable junk.
2. Can I delete everything inside C:\Windows\Temp or %temp%?
You can generally remove temporary files that are not currently being used, but you should not force deletion of files that Windows or an application reports as locked.
More importantly, do not extend this rule to arbitrary folders under C:\Windows.
Windows has several directories containing files that may look temporary but are required for updates, servicing, drivers, recovery, or normal operation.
3. Why does free space sometimes disappear again after Windows Update?
Windows may temporarily require additional disk space while downloading, unpacking, installing, and servicing an update. Cleanup data can also remain until Windows determines that it is safe to remove it.
If the drive repeatedly becomes critically full, check Settings → System → Storage → Temporary files, run Disk Cleanup with system files, and investigate which category is growing rather than repeatedly deleting random system folders.
The safest rule is simple: use Windows’ own cleanup mechanisms first, then investigate unusually large folders instead of manually deleting system files.